Posts Tagged ‘linux’

hackedOccasionally you need to mirror a website (or a directory inside one). If you’ve only got HTTP access, there are tools like httrack which are pretty good (albeit pretty ugly) at doing this. However, as far as I can tell, you can’t use httrack on a password-protected website.

curl can probably do this too, and supports authentication, but it wasn’t obvious.

So I ended up using wget, as it supports mirroring and credentials. But the issue here is that wget plays nice and respects robots.txt; which can actually prevent you mirroring a site you own. And nothing in the man page explains how to ignore robots.txt.

Eventually, I came up with this incantation, which works for me (access to password-protected site, full mirror, ignoring robots.txt):

wget -e robots=off --wait 1 -x --user=xxx --password=xxx -m -k http://web_site_name_to_mirror/

where:

  • -e robots=off obviously disables robots
  • –wait 1 forces a pause between gets (so the site doesn’t get hammered)
  • –user and –password: self-evident
  • -x creates a local directory structure which “mirrors” (see what I did there?) the directory structure on the site you’re mirroring
  • -m turns on mirror mode: “turns on recursion and time-stamping, sets infinite recursion depth and keeps FTP directory listings” (from the man page)
  • -k converts links after download so that URLs in the mirrored files reference local files

Don’t use it carelessly on someone else’s website, as they might get angry…

Published on Nov 17, 2012
In Linux, everything is a file. All the files the kernel can understand are displayed.

If you develop web applications and scripts, it will be nice testing them locally in your own computer before launching them online. This will require the installation of a webserver on your computer.LAMP (Linux, Apache, MySQL, PHP) is one of the easiest and perfect environment where you can test all your PHP codes. In this tutorial, we will help you install the LAMP webserver in the following Ubuntu/Linux Mint distributions:

  • Ubuntu 13.04/12.1012.04/11.10 or older
  • Linux Mint 14/13/12 or older

LAMP Installation

The LAMP webserver can be installed easily with this command (the caret (^) is required, don’t exclude it):

sudo apt-get install lamp-server^

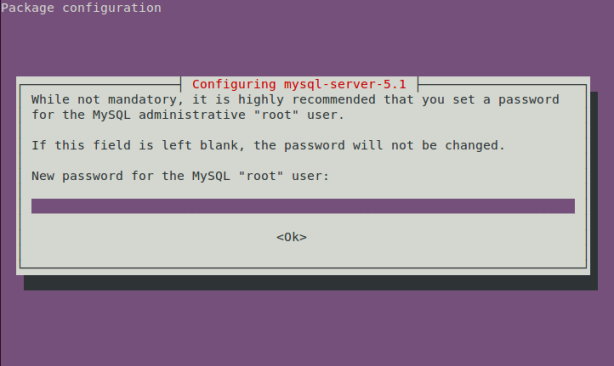
During the installation, you will be asked to enter a new root password for the MySQL database, submit it and press Enter:
MySQL-Password

You will be prompted to enter the password again for confirmation. Wait now until the installation is complete. You have now installed the LAMP webserver on Ubuntu 11.04/11.10. Let’s now go to the next step.

Testing Apache

Launch your web browser (Firefox, Google Chrome, etc.) and open one of these addresses (or provide your server IP address if needed):

http://localhost/

or

http://127.0.0.1/

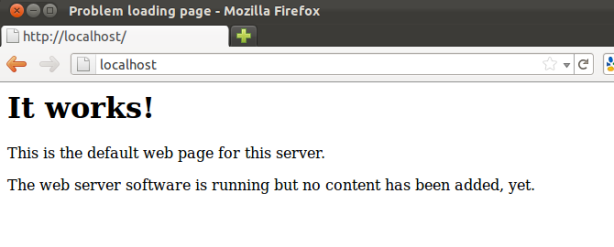
If you get this page, then Apache is started:
Apache-it-works

Otherwise try to restart Apache with this command:

sudo /etc/init.d/apache2 restart

Then give it another try.

Testing PHP

Let’s now test PHP. You need to create an empty PHP file in /var/www  and insert this snippet of code into it:

<?php phpinfo(); ?>

You can easily do it with these two commands via the terminal:

echo “<?php phpinfo(); ?>” | sudo tee /var/www/test.php


sudo /etc/init.d/apache2 restart


Then open this address:

http://localhost/test.php

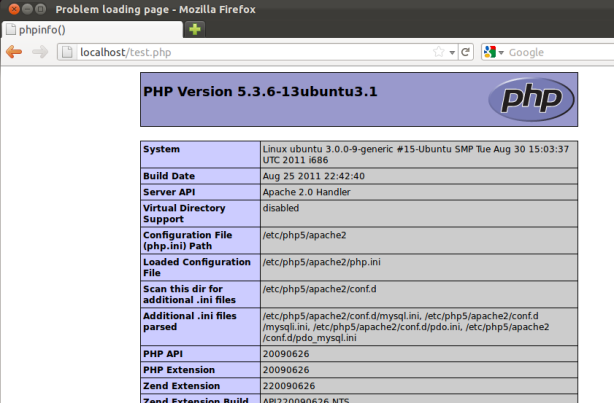
You should see a page like this:
test-php

Configuring MySQL

Since you are using the LAMP webserver locally, your MySQL database must uses the same IP address of your localhost which is: 127.0.0.1. Via the Terminal, run this command to verify it:

cat /etc/hosts | grep localhost

Here is the correct output you must get:

~$ cat /etc/hosts | grep localhost
127.0.0.1 localhost
::1     ip6-localhost ip6-loopback


Also verify that the bind address is set correctly by running this command:

cat /etc/mysql/my.cnf | grep bind-address

You should get this output:

~$ cat /etc/mysql/my.cnf | grep bind-address
bind-address = 127.0.0.1

If you get a different IP address, then edit the my.cnf file with this command:

sudo gedit /etc/mysql/my.cnf

Search for the line containing “bind-address” and correct its address by replacing it with 127.0.0.1.

phpMyAdmin Installation

If you want an easy GUI for managing your MySQL databases, you can install phpMyAdmin with this command:

sudo apt-get install libapache2-mod-auth-mysql phpmyadmin

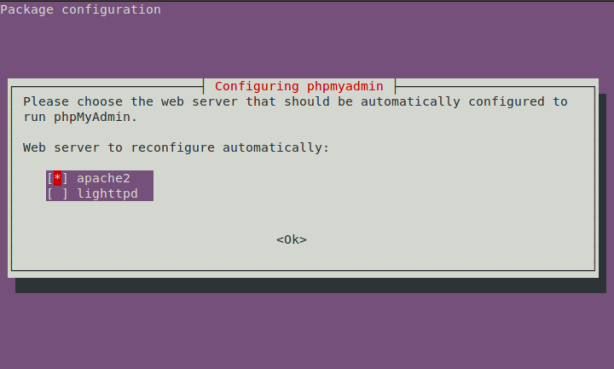
During the installation you will be asked to select a web server that will be configured automatically to run phpMyAdmin. Select apache2 using your spacebar and press Enter:
select-apache2-lamp

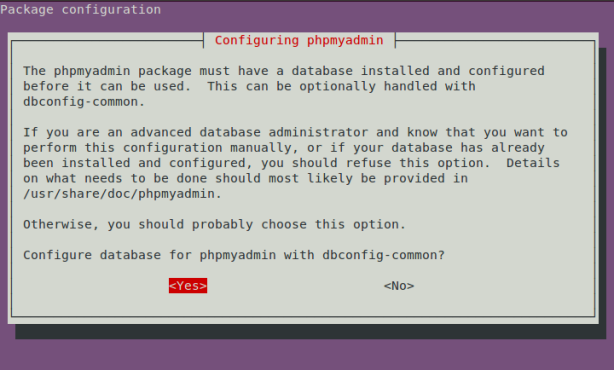
You will be asked next to configure a database for phpmyadmin with dbconfig-common, select Yes and press Enter:

phpmyadmin-dbconfig-commonIn the next screen, enter the MySQL password you have submitted before and press Enter:

[
OR,

Select  NO and press ENTER
And, Type below command in terminal

sudo cp /etc/phpmyadmin/apache.conf /etc/apache2/conf.d

restart your apache server using

sudo /etc/init.d/apache2 restart

]

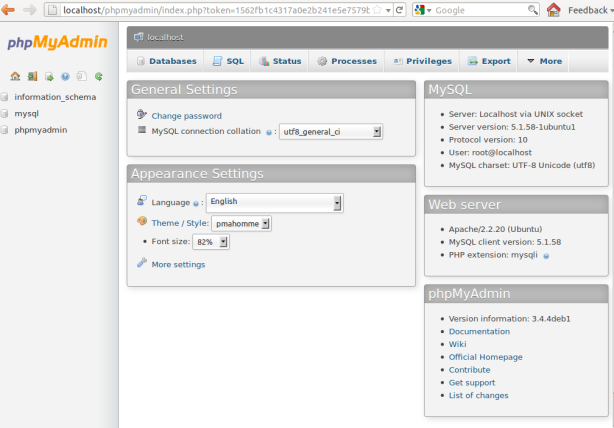
Congratulation! phpMyAdmin is now installed in your system. To test it, open simply this address via your web browser:

http://localhost/phpmyadmin/

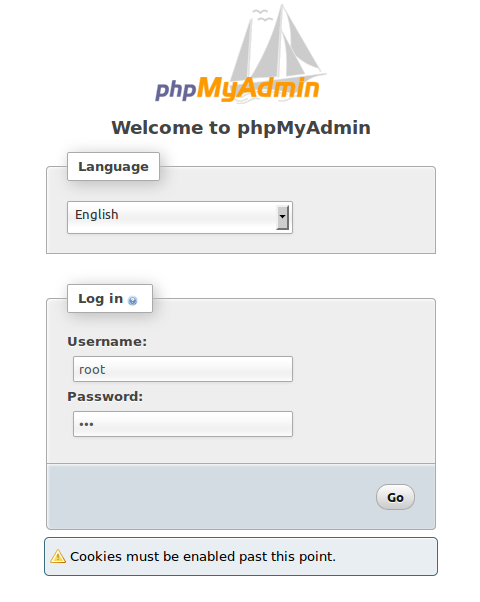
Login to phpMyAdmin using root as username and the password you created earlier:

phpmyadmin (1)

phpmyadmin (2)

You have now successfully installed LAMP on your system. All your projects and files must be placed in /var/www so that you can run them.

Removing LAMP & phpMyAdmin

To uninstall the LAMP web server and phpMyAdmin, open the terminal and run this command:

for pkg in `dpkg -l *apache* *mysql* phpmyadmin | grep ^ii | awk ‘{ print $2 }’`; do sudo apt-get -y purge –auto-remove $pkg; done;

That’s it!
Enjoy!

Basic Linux Commands

Posted: January 19, 2013 in Linux Terminal
Tags: , ,

If you are a new user, you must try these commands. And believe me Working with Terminal is simply interesting.

mkdir – make directories

Usage

mkdir [OPTION] DIRECTORY

Options

Create the DIRECTORY(ies), if they do not already exist.

 Mandatory arguments to long options are mandatory for short options too.

 -m, mode=MODE  set permission mode (as in chmod), not rwxrwxrwx – umask

 -p, parents  no error if existing, make parent directories as needed

 -v, verbose  print a message for each created directory

 -help display this help and exit

 -version output version information and exit

cd – change directories

Use cd to change directories. Type cd followed by the name of a directory to access that directory.Keep in mind that you are always in a directory and can navigate to directories hierarchically above or below.

mv- change the name of a directory

Type mv followed by the current name of a directory and the new name of the directory.

 Ex: mv testdir newnamedir

pwd – print working directory

will show you the full path to the directory you are currently in. This is very handy to use, especially when performing some of the other commands on this page

 rmdir – Remove an existing directory

 rm -r

Removes directories and files within the directories recursively.

chown – change file owner and group

Usage

chown [OPTION] OWNER[:[GROUP]] FILE

chown [OPTION] :GROUP FILE

chown [OPTION] –reference=RFILE FILE

Options

Change the owner and/or group of each FILE to OWNER and/or GROUP. With –reference, change the owner and group of each FILE to those of RFILE.

 -c, changes like verbose but report only when a change is made

 -dereference affect the referent of each symbolic link, rather than the symbolic link itself

 -h, no-dereference affect each symbolic link instead of any referenced file (useful only on systems that can         change the ownership of a symlink)

 -from=CURRENT_OWNER:CURRENT_GROUP

  change the owner and/or group of each file only if its current owner and/or group match those specified here.  Either  may  be  omitted,  in which case a match is not required for the omitted attribute.

-no-preserve-root do not treat `/’ specially (the default)

-preserve-root fail to operate recursively on `/’

-f, -silent, -quiet  suppress most error messages

-reference=RFILE use RFILE’s owner and group rather than the specifying OWNER:GROUP values

-R, -recursive operate on files and directories recursively

-v, -verbose output a diagnostic for every file processed

The  following options modify how a hierarchy is traversed when the -R option is also specified. If more than one is specified, only the final one  takes effect.

-H     if a command line argument is a symbolic link to a directory, traverse it

-L     traverse every symbolic link to a directory encountered

-P     do not traverse any symbolic links (default)

chmod – change file access permissions

Usage

chmod [-r] permissions filenames

 r  Change the permission on files that are in the subdirectories of the directory that you are currently in.        permission  Specifies the rights that are being granted. Below is the different rights that you can grant in an alpha  numeric format.filenames  File or directory that you are associating the rights with Permissions

u – User who owns the file.

g – Group that owns the file.

o – Other.

a – All.

r – Read the file.

w – Write or edit the file.

x – Execute or run the file as a program.

Numeric Permissions:

CHMOD can also to attributed by using Numeric Permissions:

400 read by owner

040 read by group

004 read by anybody (other)

200 write by owner

020 write by group

002 write by anybody

100 execute by owner

010 execute by group

001 execute by anybody

ls – Short listing of directory contents

-a        list hidden files

-d        list the name of the current directory

-F        show directories with a trailing ‘/’

            executable files with a trailing ‘*’

-g        show group ownership of file in long listing

-i        print the inode number of each file

-l        long listing giving details about files  and directories

-R        list all subdirectories encountered

-t        sort by time modified instead of name

cp – Copy files

cp  myfile yourfile

Copy the files “myfile” to the file “yourfile” in the current working directory. This command will create the file “yourfile” if it doesn’t exist. It will normally overwrite it without warning if it exists.

cp -i myfile yourfile

With the “-i” option, if the file “yourfile” exists, you will be prompted before it is overwritten.

cp -i /data/myfile

Copy the file “/data/myfile” to the current working directory and name it “myfile”. Prompt before overwriting the  file.

cp -dpr srcdir destdir

Copy all files from the directory “srcdir” to the directory “destdir” preserving links (-poption), file attributes (-p option), and copy recursively (-r option). With these options, a directory and all it contents can be copied to another dir

ln – Creates a symbolic link to a file.

ln -s test symlink

Creates a symbolic link named symlink that points to the file test Typing “ls -i test symlink” will show the two files are different with different inodes. Typing “ls -l test symlink” will show that symlink points to the file test.

locate A fast database driven file locator.

slocate -u

This command builds the slocate database. It will take several minutes to complete this command.This command must be used before searching for files, however cron runs this command periodically  on most systems.locate whereis Lists all files whose names contain the string “whereis”. directory.

more – Allows file contents or piped output to be sent to the screen one page at a time

less – Opposite of the more command

cat Sends file contents to standard output. This is a way to list the contents of short files to the screen. It works well with piping.

whereis Report all known instances of a command

wc – Print byte, word, and line counts

bg

bg jobs Places the current job (or, by using the alternative form, the specified jobs) in the background, suspending its execution so that a new user prompt appears immediately. Use the jobs command to discover the identities of background jobs.

cal month year Prints a calendar for the specified month of the specified year.

cat files Prints the contents of the specified files.

clear Clears the terminal screen.

cmp file1 file2 Compares two files, reporting all discrepancies. Similar to the diff command, though the output format differs.

diff file1 file2 Compares two files, reporting all discrepancies. Similar to the cmp command, though the output format differs.

dmesg Prints the messages resulting from the most recent system boot.

fg

fg jobs Brings the current job (or the specified jobs) to the foreground.

file files Determines and prints a description of the type of each specified file.

find path -name pattern -print

Searches the specified path for files with names matching the specified pattern (usually enclosed in single quotes) and prints their names. The find command has many other arguments and functions; see the online documentation.

finger users – Prints descriptions of the specified users.

free  – Displays the amount of used and free system memory.

ftp hostname

Opens an FTP connection to the specified host, allowing files to be transferred. The FTP program provides subcommands for accomplishing file transfers; see the online documentation.

head files Prints the first several lines of each specified file.

ispell files Checks the spelling of the contents of the specified files.

kill process_ids

kill – signal process_ids

kill -l

Kills the specified processes, sends the specified processes the specified signal (given as a number or name), or prints a list of available signals.

killall program

killall – signal program

Kills all processes that are instances of the specified program or sends the specified signal to all processes that are instances of the specified program.

mail Launches a simple mail client that permits sending and receiving email messages.

man title

man section title – Prints the specified man page.

ping host Sends an echo request via TCP/IP to the specified host. A response confirms that the host is operational.

reboot Reboots the system (requires root privileges).

shutdown minutes

shutdown -r minutes

Shuts down the system after the specified number of minutes elapses (requires root privileges). The -r option causes the system to be rebooted once it has shut down.

sleep time Causes the command interpreter to pause for the specified number of seconds.

sort files Sorts the specified files. The command has many useful arguments; see the online documentation.

split file Splits a file into several smaller files. The command has many arguments; see the online documentation

sync Completes all pending input/output operations (requires root privileges).

telnet host Opens a login session on the specified host.

top Prints a display of system processes that’s continually updated until the user presses the q key.

traceroute host Uses echo requests to determine and print a network path to the host.

uptime Prints the system uptime.

w Prints the current system users.

wall Prints a message to each user except those who’ve disabled message reception. Type Ctrl-D to end the message.

6 Stages of Linux Boot Process

Press the power button on your system, and after few moments you see the Linux login prompt.

Have you ever wondered what happens behind the scenes from the time you press the power button until the Linux login prompt appears?

The following are the 6 high level stages of a typical Linux boot process.

1. BIOS

  • BIOS stands for Basic Input/Output System
  • Performs some system integrity checks
  • Searches, loads, and executes the boot loader program.
  • It looks for boot loader in floppy, cd-rom, or hard drive. You can press a key (typically F12 of F2, but it depends on your system) during the BIOS startup to change the boot sequence.
  • Once the boot loader program is detected and loaded into the memory, BIOS gives the control to it.
  • So, in simple terms BIOS loads and executes the MBR boot loader.

2. MBR

  • MBR stands for Master Boot Record.
  • It is located in the 1st sector of the bootable disk. Typically /dev/hda, or /dev/sda
  • MBR is less than 512 bytes in size. This has three components 1) primary boot loader info in 1st 446 bytes 2) partition table info in next 64 bytes 3) mbr validation check in last 2 bytes.
  • It contains information about GRUB (or LILO in old systems).
  • So, in simple terms MBR loads and executes the GRUB boot loader.

3. GRUB

    • GRUB stands for Grand Unified Bootloader.
    • If you have multiple kernel images installed on your system, you can choose which one to be executed.
    • GRUB displays a splash screen, waits for few seconds, if you don’t enter anything, it loads the default kernel image as specified in the grub configuration file.
    • GRUB has the knowledge of the filesystem (the older Linux loader LILO didn’t understand filesystem).
    • Grub configuration file is /boot/grub/grub.conf (/etc/grub.conf is a link to this). The following is sample grub.conf of CentOS.
#boot=/dev/sda
default=0
timeout=5
splashimage=(hd0,0)/boot/grub/splash.xpm.gz
hiddenmenu
title CentOS (2.6.18-194.el5PAE)
          root (hd0,0)
          kernel /boot/vmlinuz-2.6.18-194.el5PAE ro root=LABEL=/
          initrd /boot/initrd-2.6.18-194.el5PAE.img
  • As you notice from the above info, it contains kernel and initrd image.
  • So, in simple terms GRUB just loads and executes Kernel and initrd images.

4. Kernel

  • Mounts the root file system as specified in the “root=” in grub.conf
  • Kernel executes the /sbin/init program
  • Since init was the 1st program to be executed by Linux Kernel, it has the process id (PID) of 1. Do a ‘ps -ef | grep init’ and check the pid.
  • initrd stands for Initial RAM Disk.
  • initrd is used by kernel as temporary root file system until kernel is booted and the real root file system is mounted. It also contains necessary drivers compiled inside, which helps it to access the hard drive partitions, and other hardware.

5. Init

  • Looks at the /etc/inittab file to decide the Linux run level.
  • Following are the available run levels
    • 0 – halt
    • 1 – Single user mode
    • 2 – Multiuser, without NFS
    • 3 – Full multiuser mode
    • 4 – unused
    • 5 – X11
    • 6 – reboot
  • Init identifies the default initlevel from /etc/inittab and uses that to load all appropriate program.
  • Execute ‘grep initdefault /etc/inittab’ on your system to identify the default run level
  • If you want to get into trouble, you can set the default run level to 0 or 6. Since you know what 0 and 6 means, probably you might not do that.
  • Typically you would set the default run level to either 3 or 5.

6. Runlevel programs

  • When the Linux system is booting up, you might see various services getting started. For example, it might say “starting sendmail …. OK”. Those are the runlevel programs, executed from the run level directory as defined by your run level.
  • Depending on your default init level setting, the system will execute the programs from one of the following directories.
    • Run level 0 – /etc/rc.d/rc0.d/
    • Run level 1 – /etc/rc.d/rc1.d/
    • Run level 2 – /etc/rc.d/rc2.d/
    • Run level 3 – /etc/rc.d/rc3.d/
    • Run level 4 – /etc/rc.d/rc4.d/
    • Run level 5 – /etc/rc.d/rc5.d/
    • Run level 6 – /etc/rc.d/rc6.d/
  • Please note that there are also symbolic links available for these directory under /etc directly. So, /etc/rc0.d is linked to /etc/rc.d/rc0.d.
  • Under the /etc/rc.d/rc*.d/ directories, you would see programs that start with S and K.
  • Programs starts with S are used during startup. S for startup.
  • Programs starts with K are used during shutdown. K for kill.
  • There are numbers right next to S and K in the program names. Those are the sequence number in which the programs should be started or killed.
  • For example, S12syslog is to start the syslog deamon, which has the sequence number of 12. S80sendmail is to start the sendmail daemon, which has the sequence number of 80. So, syslog program will be started before sendmail.

There you have it. That is what happens during the Linux boot process

Linux Inspires

Posted: January 10, 2013 in Videos
Tags: ,

A video by Linux Foundation


Linux Terminal
Terminal is a text-based interface that grants users direct access to the UNIX system. You can use Terminal to run some specific commands, create files/folders, change system settings, and any other features that aren’t available via programs with GUI.
In this article, I have collected 20 tools and commands that can be useful for Ubuntu/Linux Mint users. If you have more interesting commands or tools, you can mention them below.

1. Make An ISO From A Folder

If you want to make an iso file from a directory containing other files and sub-directories via the terminal, you can use the following command:

mkisofs -o image.iso -R /path/to/folder/

If you wish to backup the home folder, use this command:

mkisofs -o image.iso -R $HOME

2. Remove Non-Empty Folder

To remove a non-empty folder from the command line, you can use this command:

rm -rf /path/to/folder/

3. Checking Current CPU Architecture (32-bit or 64-bit)

To list your processor architecture in Ubuntu/Linux Mint, use one of these commands:

uname -m

or

arch

or

file /bin/bash | cut -d’ ‘ -f3

4. Generate Random Passwords

To generate random passwords via the terminal, you can use the following commands:

a – makepasswd

makepasswd is a command line tool for generating passwords in Ubuntu/Linux Mint. Install it with this command:

sudo apt-get install makepasswd

To generate a password with 20 characters, enter this command:

makepasswd –chars=20

b- OpenSSL

You can also use OpenSSL to generate random passwords using this simple command:

openssl rand -base64 20

5. Check Uptime

To check for how long your computer or laptop has been running since you powered it on, issue this command:

uptime

To monitor system uptime in real-time, use this command:

watch -n 1 uptime

6. Check Information About Your Video Card

To list information about your graphics card (Nvidia, AMD, Intel, etc.), enter this command:

lspci -v -s `lspci | awk ‘/VGA/{print $1}’`

7. Download And Extract Tar Files In One Command

If you want to extract an archive file after being downloaded in a single command, you can use the following command for tar files:

wget URL-To-TAR-File -O – | tar xfz –

Here is an example:

wget http://garr.dl.sourceforge.net/project/multibootusb/MultiBootUSB_4.7.tar.gz -O – | tar xfz –

8. Block/Unblock Wifi/Bluetooth

To disable wifi or Bluetooth in Ubuntu/Linux Mint, we can simply use the rfkill command line tool. To deactivate wifi, enter this command:

rfkill block wlan

For Bluetooth:

rfkill block bluetooth

To unblock WiFi, enter this command:

rfkill unblock wlan

For Bluetooth:

rfkill unblock bluetooth

9. Check CPU Temperature

To get the current temperature of your processor, issue this command:

acpi -t

To check CPU temp in real-time, run this command:

watch -n 1 acpi -t

10. Change Read Speed Of A CD/DVD

Let’s first get the maximum read speed of your optical drive with this command:

eject -X

To increase/decrease read speed of a CD/DVD inserted into your optical drive, enter this command followed by the desired speed:

eject -x 4

For more than one optical disc drive, use this command:

eject /dev/cdrom -x 4

11. Check RAM Speed

To check memory speed from the command line, run this command:

sudo dmidecode -t 17 | awk -F”:” ‘/Speed/ { print $2 }’

12. Read/Write Speed Of A Hard Disk

To check read/write speed of your hard drive on the terminal, use this command:

sudo hdparm -tT /dev/sda

13. Monitor Network Usage

IPTraf is a command line utility that allows to monitor network activities in real-time. Install it in Ubuntu/Linux Mint with this command:

sudo apt-get install iptraf

Start monitoring using this command:

sudo iptraf

14- Downloading Websites

If you want to download an entire website via the terminal, enter this command:

wget –recursive –page-requisites –convert-links http://www.domain.com

15. Check Gmail Unread Messages

To check for unread messages in your Gmail account, use this command:

curl -u GMAILUSER –silent “https://mail.google.com/mail/feed/atom&#8221; | perl -ne ‘print “\t” if //; print “$2\n” if /<(title|name)>(.*)<\/\1>/;’

16. Monitor HDD Temperature

Use hddtemp to monitor hard disk temperature on the terminal. Run these commands:

sudo apt-get install hddtemp

sudo hddtemp /dev/sda

17. Force Kill Apps

To force close an unresponsive software, run xkill from the terminal then click the software’s window to close it.

18. Screen Recording

To capture your screen and record it in a video, use ffmpeg:

sudo apt-get install ffmpeg

ffmpeg -f x11grab -s wxga -r 25 -i :0.0 -sameq output.mpg

19. Check Current Kernel Version

You can simply use this command:

uname -r

20. Dtrx

The dtrx tool allows to extract most archive files without the hassle of memorizing the various extraction commands. To install it, run this command:

sudo apt-get install dtrx

Here are some examples:

dtrx file.zip

dtrx file.tar.gz

dtrx file.7z